Stoplik Service (India) Pvt. Ltd.
Home About Us Our Philosophy Clients Contact Us Online Quote
Compression Gland      Packings
Non-Compression Gland      Packings
Insitumold & Sealing Cords
Graphite Rings, Tape &      Spiral Wound Gasket
Ceramic Metallic/Non      Metallic Rope, Tape, Cloth      & Blanket
High Temperature Gland      Packings
Marine Packings & Sealants
100% Asbestos Free Fibre Glass Product
100% Asbestos Free Welding Blankets
PTFE Products
Seminar & Training
Expert Advice
Instructions For      Installtion & Calculations
FAQ
Instructions For Installtion & Calculations

1. Remove all the old Gland packing from stuffing box. Clean the shaft and stuffing box.
2. Check the clearance in Neck Bush and Gland follower.
3. Check the condition of sleeve and be assure that sleeve/ shaft is not scored.
4. Check the correct Gland packing size.
(ID of Stuffing box OD of Shaft/Sleeve = Correct Gland Packing size.)
                                           1/2
5. Cut the packing rings in 45° cut. The one cut end should be above the other cut end as show in fig 1

6. The joints of Gland packings should be as follows and repeat the same for more no. of rings.

7. Do not tighten the gland follower excessively.
8. Allow Gland packing to leak freely when starting up a newly packed pump.
9. Tighten the gland follower slowly at 10 minutes interval till leakage is reduced to a tolerable level.
10. Never try to stop leakage entirely.
11. If the Stuffing box has a lantern ring check it for clearance.
12. Replace Gland packing when leakage cannot be controlled by further tightening of the gland follower.

Calculation Help

Formula
Calculate Gland Packing Ring Length
Shaft Speed Conversion: Metric-English
STUFFING BOX
Calculate the Stuffing Box Volume of CMS-2000
PUMPS
Calculate Pounds Per Square Inch
Calculate Head P.S.I.
Calculate Brake Horsepower
Instructions You Must Follow Stricty While Using Insitu Mold
1. Remove all the material of the previous damaged packings so that the stuffing box is absolutely clean.
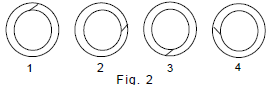
2. Put two new rings properly cut at 45° and having overlapping joint staggered at 12 'O' Clock and 3 'O' Clock position in case of 5 rings in pump
3. A. Make pieces of Insitu Mold, put these pieces around the shaft in stuffing box.
B. Tighten the gland follower with 'clean used rings'.
C Simultaneously rotate the shaft in order to form 'voidless ring'.
4. Now remove the 'old ring' and replace new ring/rings. Do not tighten gland follower excessively, i.e. the gland follower should be finger tightened only. Now start the pump and allow initial leakage, tighten gland follower very slowly i.e. 1/8th of turn every 20 mins to the required amount of leakage.
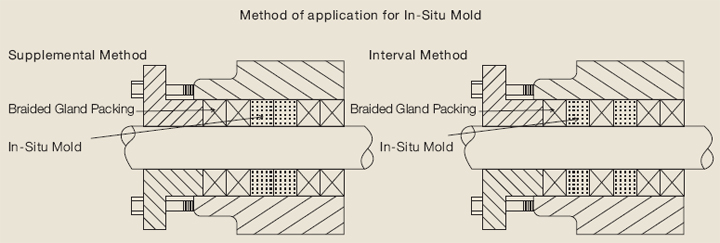
5. While forming ring/rings, see that one ring of Insitu Mold is formed near the gland follower, sandwiched between two braided rings. When nos. of rings are more than 5, only outer ring of mold should be properly formed as Zero leakage may burn the packing set.
6. Never form a ring of Insitu Mold having thickness more than the packing in use.
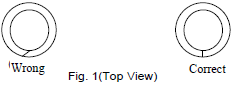
7. Never ever keep the gap between the joints of the ring as Insitu Mold will extrude through these gaps either into the system or out of stuffing box.
8. Take care of flushing connection and lantern ring position, as Insitu Mold may extrude in it and block the flushing connection.
 
© Copyright 2011 Stoplik Service (India) Pvt. Ltd. All right reserved. Maxklick Interactive Media Pvt. Ltd.
Please fill the below form to get an online quotation.
Company Name  
Contact Person  
Tele. / Mobile  
Email *  
City  
State  
Product Requires / Interested in  
Message